Introduction
The Custom Metric feature allows MachineLogic program variables to be displayed through the MachineAnalytics dashboard. This feature allows users to view program variables to monitor critical metrics, debug processes, and optimize performance without diving into code. Whether you’re managing production lines, Deploying machines, or fine-tuning processes, this feature provides clear visibility into your program’s state, empowering you to make data-driven decisions efficiently.
This guide provides the guidelines to configure custom metrics for any MachineLogic programs running on a MachineMotion controller.
Important: The MachineAnalytics Custom Metric feature can only display numerical values.
MachineLogic Code-Free
Please note that MachineLogic Code-Free programming does not yet provide a code-free instruction to send variables to MachineAnalytics. The steps below show how to manually send a variable value to MachineAnalytics using Lambda functions and the Add Output instruction *
For any assistance while using the custom metric feature with Code-Free programming, contact your Customer Success Specialist at integrationsupport@vention.cc
Follow along the step below with the code-free application supplied in This design
Step 1 - From the Variable section of the Assets in the left pane of MachineLogic, create the program variable to monitor. In this example, a second variable is created in the form of json object consisting of the variable name and value. This will be used to format the data sent to the MachineAnalytics dashboard.
Variables to monitor:
PartsProcessed- Initial value:0PartsFailed- Initial value:0PartsBuilt- Initial value:0
Variable for message formatting:
CustomMetricPayloadInitial value:
{"name":"Your Metric Name","value": 0}
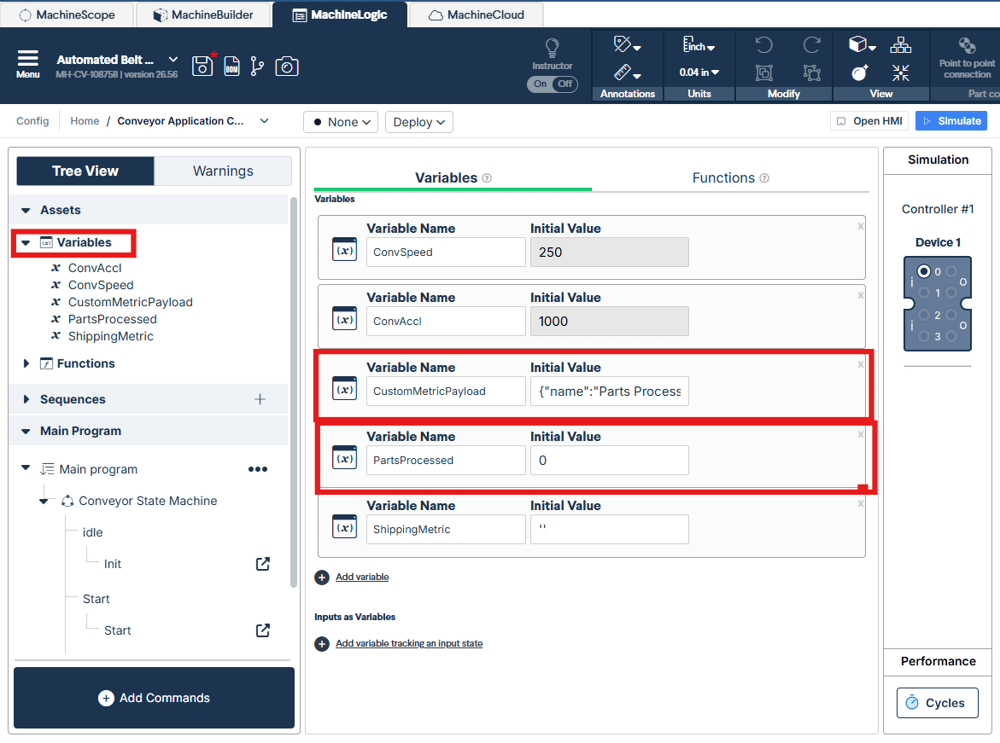 image |
Step 2 - From the Functions section of the Assets in the left pane of MachineLogic, create a lambda function updating the value of the variable:
Function Name:
updateCustomMetricArguments:
metricObject, metricName, metricValueFunction:
metricObject.name = metricName; metricObject.value = metricValue; return metricObject;
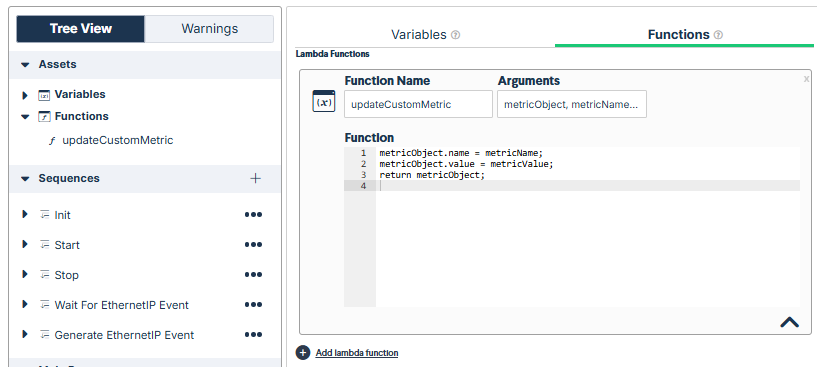 image |
Step 3 - In any sequence, add a Add Output instruction.
Step 4 - From the Output drop-down, select Generate Event, this will send an MQTT message
Step 5 - In the Topic field, format the topic as: custom-numerical-metric
Step 6 - In the Message field, format the message as:
updateCustomMetric(CustomMetricPayload,'Parts Processed',PartsProcessed)updateCustomMetric(CustomMetricPayload,'Parts Failed',PartsFailed)updateCustomMetric(CustomMetricPayload,'Parts Built',PartsBuilt)
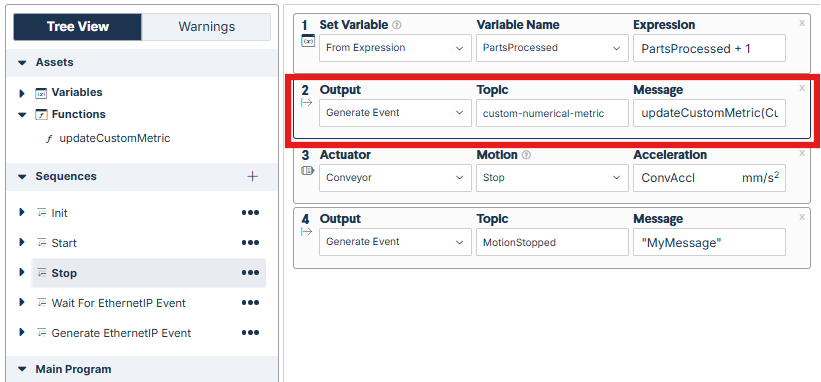 image |
Step 7 - to add a new variable
MachineLogic Python
Below is a Python example demonstrating how a variable value can be made accessible to the MachineAnalytics custom metric feature
import time
import json
from machinelogic import Machine

machine = Machine()

# Example for publishing custom metric to the analytics dashboard
# to track application cycles in MachineAnalytics
PartsProcessed = 0
PartsFailed = 0
PartsBuilt = 0

custom_metric_topic = "custom-numerical-metric" #configuration of the MQTT Topic
custom_metric_message = {
    "name":"Your Metric Name", # Name of the variable sent to MachineAnalytics through the MQTT topic
    "value":0
}

while True:
    print("Cycle Start")
    time.sleep(5)
    PartsProcessed += 1
    # Publish your first metric
    custom_metric_message["value"] = PartsProcessed
    custom_metric_message["name"] = "Parts Processed" # Name of the variable sent to MachineAnalytics through the MQTT topic
    json_metric_message = json.dumps(custom_metric_message)
    machine.publish_mqtt_event(custom_metric_topic, custom_metric_message) #publishing the MQTT Topic and Message

    # Publish your second metric
    custom_metric_message["value"] = PartsFailed
    custom_metric_message["name"] = "Parts Failed" # Name of the variable sent to MachineAnalytics through the MQTT topic
    json_metric_message = json.dumps(custom_metric_message)
    machine.publish_mqtt_event(custom_metric_topic, custom_metric_message) #publishing the MQTT Topic and Message

    # Publish your third metric
    custom_metric_message["value"] = PartsBuilt
    custom_metric_message["name"] = "Parts Built" # Name of the variable sent to MachineAnalytics through the MQTT topic
    json_metric_message = json.dumps(custom_metric_message)
    machine.publish_mqtt_event(custom_metric_topic, custom_metric_message) #publishing the MQTT Topic and Message

    print("Cycle end")
Displaying the Variable Value in MachineAnalytics
To display the custom metric, simply select the Add Metric button from your MachineAnalytics dashboard and select the metric you want to display. From there, select the variable to display on your MachineAnalytics dashboard
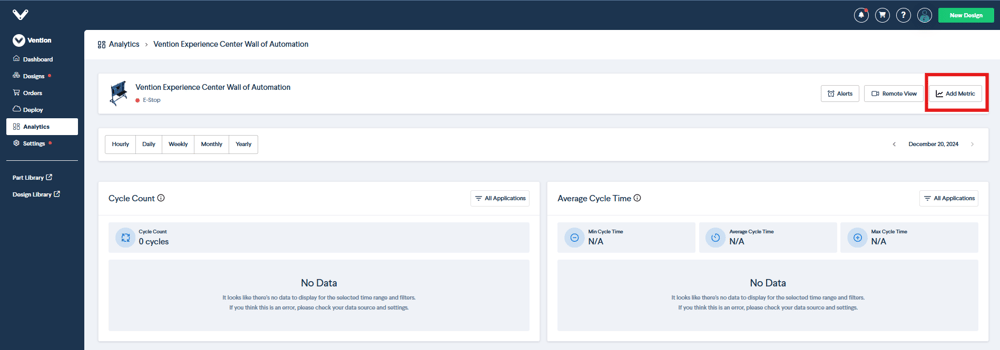 image |