This document covers requirements for current version of Remote View 2. For previous version, refer to link below:
Technical Specifications
Technical Specifications for the Remote View 2 Kit.
Requirements for Product Operation
To ensure the successful operation of this product, the following prerequisites are required:
MachineMotion AI controller;
Active subscription linked to the design which contains your MachineMotion AI controller.
Assemble & Adjust Hardware
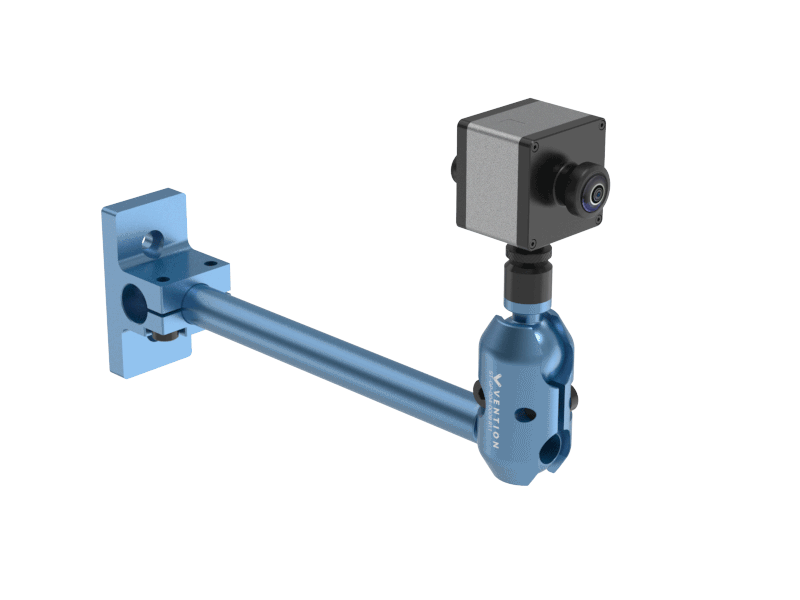
Attach the camera to the male thread on the blue structure, but don't tighten it completely yet. Instead, turn the camera to face your desired direction. To secure it, tighten the thumb nut against the camera, then turn the camera the opposite direction while holding the nut to ensure it's fully tightened.
.png)
Mount the articulated arm to your structure using the two included M8 × 18mm screws and a 5mm hex drive. If mounting on 22.5×22.5mm extrusion, use the included M8 × 12mm screws.
Note: For best camera quality and mechanical reliability, mount the articulated arm on a part of your structure where vibrations are minimal.Adjust the camera position by loosening the 2 screws near the ball joints and the knurled thumb nut at the base of the camera. This allows you to precisely aim the camera at your desired area as shown below. the ball joint adjustment range is 180 degrees.
 Articulated Arm Adjustability |
Once adjusted, tighten the 2 screws and thumb nut described in the step above.
Remove the lens cap.
Connect your camera
The camera cable has a nominal length of 10 meters (CE-CA-016-0100) and comes already pre-mated to the remote viewing camera. Simply connect the camera cable directly to the MachineMotion on the “Live Camera” port (M12 X coded).
.png)
Connect to the Internet
To establish the connection from your machine to the cloud, you will need to be connected to the internet.
In the Control Center, navigate to the Settings page.
From the Network section, select and connect to the network of your choice, for example, via the Wi-Fi interface.
Connect to MachineAnalytics
Log in to your account on the vention.io platform.
Navigate to your dashboard and click on the Analytics tab.

Identify the machine you want to monitor and click on RemoteView.
Note: From the moment you connect the camera, allow a few minutes for the camera to be detected and streamed.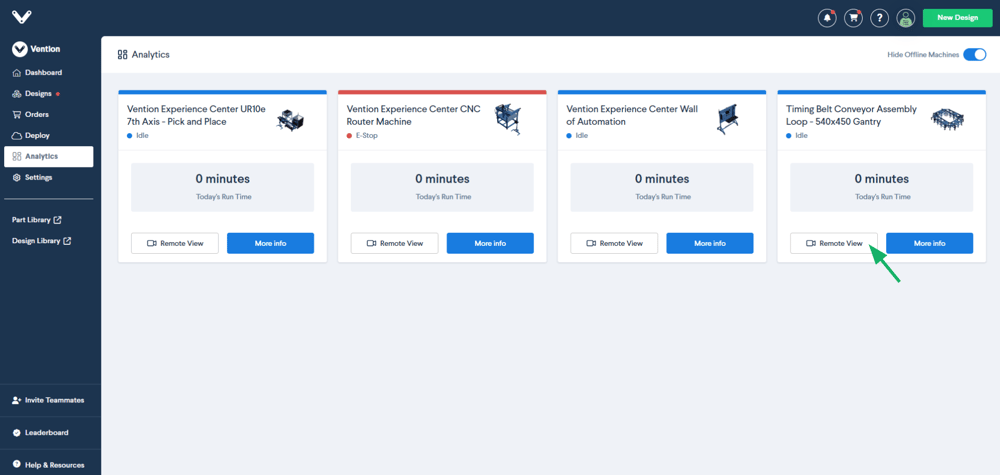
Once on the RemoteView page, you should see the live video stream of the camera you just installed.
Note: If you see the “offline” screen, make sure your camera is well connected and that you have an internet connection. Once that is confirmed, refresh the page..png)
You can leverage this live stream to move the camera to the desired position for monitoring.
RemoteView Recording
With a RemoteView Recording subscription, you can play back video footage of your machine for the duration included in your subscription plan.
Playback Controls
Play / Pause: Start or stop the recording playback.
Skip Forward / Backward: Move through the timeline in set increments.
Jump to Date: Select a specific day from the calendar.
Return to Live: Click the Live button to return to the real-time camera feed.
Timeline Navigation
You can move through recordings using the timeline bar at the bottom of the screen. Hovering over the timeline shows the corresponding MachineMotion status for that moment.
Status Legend
The timeline includes color-coded states for MachineMotion:
Blue → Idle state
Green → Running state
Red → Emergency stop (Emergency Stop)
Grey → Offline (no status data available; camera may continue recording if powered)
Hashed section → No video recorded (camera disconnected or machine powered off)
|
.png)